Grimmwood - They Come at Night
Review
“The war changed everything; the fields became graveyards; the cities became slaughterhouses and the people turned to monsters. The whole world was an abyss of blood, fire and pain. We all lost something, and some of us lost all of it, but life refused to let go; we had to keep on going, finding shelter and something to cling too, and here we are driven to the gates of the great forest. We enter this godless place with nothing but our hope and our will to survive. With each new step there comes a new question with no easy answer, but there’s not a doubt in our hearts, we are not wanted here”.
You and others like you are trying to find somewhere to settle down away from all the chaos in the outside world. You end up at the ageless, mystical forest of Grimmwood, where you band together and build a village. It’s not going to be an easy place to live and every villager will have to pull their own weight if they want to survive in this dark forest.
First things first though, you’ll have to create your character. You can choose to be male or female, and you’ll have three randomly chosen traits for you, such as Bard, Woodsmen, Focused, Ugly etc, with a few items like food, tools or weapons. If you don’t like the character traits, then you’re able to reroll for a different set of traits and items. You only have a limited number of rerolls, so don’t be too picky when choosing.
Each of the traits will define your character; I ended up with Bard, Focused and Ugly (it’s a lie, I don’t need any beauty sleep). As a Bard, you amuse and perform for the other villagers at social events, which helps to bring sanity levels down, and you’ll get additional sanity bonus for your performance. Focused helps in complex tasks. The bonus you get for having Focused as a trait will apply to all things which need concentration-related actions, like crafting, fishing and shooting. Before you head off and start the game, you can also name and give a little backstory to your character, then you’re all set to begin. There are two game modes: Standard (which is played out in real-time 24-hour day cycle), or Blitz mode (where a single day lasts only 15 minutes).
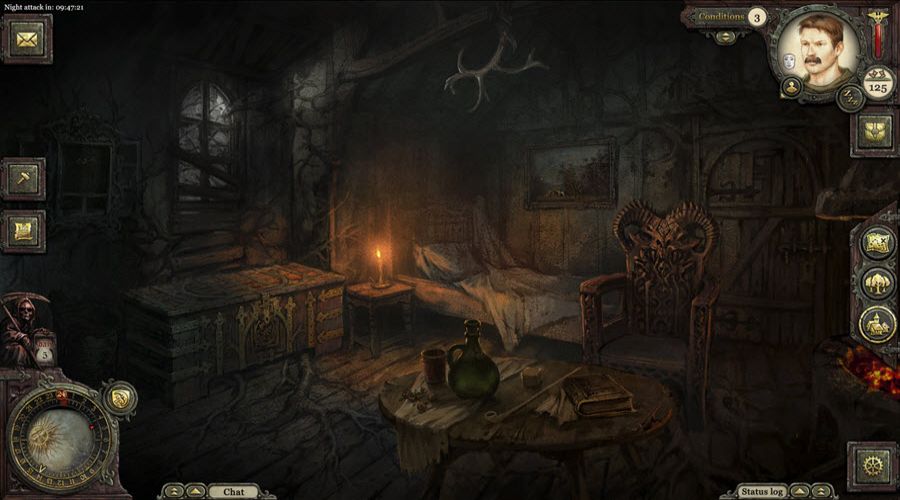
You start off in the village, and it’s probably best to go over the tutorial videos in the options first. In the village, you’ll find a common storage area where you and the other villagers can store any food, weapons, tools and materials you’ve collected or crafted and will benefit everyone (there’s no point in hording everything for yourself!).
In the village, there’s a Town Hall which gives details on all the villagers, such as who’s online, and who has died so far. You can also start a vote to banish any villager, should they be naughty. This could be a temporary banishment of three days, or a more permanent one, depending on the severity of their actions, so behave and help your fellow villagers in building and protecting your village! Also, in the Town Hall you can find profiles of the villagers, including their history, where they currently are on the map, the condition they are in, their characters traits and the last actions they performed.
You’ll also find a workshop; here you can cook raw foods and potions, make bedding and tents, split wood into planks or pillars for building defences, weapons, armour, and everything else you’ll need to help you survive. Each item you craft or food you cook requires certain materials. As with almost all actions in the game, to do anything will also require stamina points; cooking fish or meat uses one stamina point, whereas making a sword will cost fifty. Each item you’re able to craft also has a difficulty level, so someone who isn’t very good at crafting won’t be much use if they were to try and craft a sword; they’d probably just mess it up and waste materials and precious stamina. You can also repair tools, weapons etc, which you’ll need to do, as the more you use them, the more they wear down and break.
Building defences for your village is a must! There are four buildings which you can upgrade: Wall, Gate, Towers and Moat. Each one has certain construction costs for materials like planks, pillars and nails etc, and will also cost stamina points to complete; everyone will have to donate some stamina points to finish an upgrade. Early upgrades might cost 100 stamina points, but later upgrades will cost much more, and far too many for one person alone to do, as with everything about this game, teamwork is key to surviving.
Clicking on the tower in the village will open the Night Attack Prediction, which shows you the current defensive strength of the village and the strength of the next attack coming that night. Each day you’re able to scout the place to reveal any details and how your defences fair against the forthcoming attack. When scouting, it will fill a small bar a bit each time; once full, it will reveal a monster’s lair.
In the village you have your own home as well; it’s not much and is in need of a few repairs and some defensive work, but it’s probably best to use any materials on the village defences instead. In your home you can have a journal of progress from each day you’ve survived so far. There’s information on the previous day’s activity, personal accounts about the attack the previous night, and a summary. While in your home you can also choose whether you’d like to help guard the village when the attacks start, which can be risky, with a real possibility of getting wounded or even killed. Or do you hide at home and leave the guarding of the village to others?
You can also choose how you interact with the rest of the villagers by choosing to either Socialise (Dance, Play, Sing and Attend), Romance (try romancing another villager; you’ll receive fewer sanity bonuses if you have the Ugly trait), or Meditate (restore more stamina and health during the evening). Each one will help bring your sanity down if needed, and other bonuses may be available, depending on your traits.
Outside the safety of your village is where you’ll need to gather materials and foods and checking the Map of Forest will allow you to get a rough idea of your surroundings. The forest map is procedurally generated with 600 hexagonal tiles, and to uncover what lies at each location you’ll have to visit them. There are five different types of terrain in Grimmwood: Forest, Deep Forest, Swamp, Meadow and Hills, all with the possibility of having something which may benefit your village. But they may also hold hidden dangers, monsters and their lairs; scouting from the tower in the village will reveal these on the map, once enough villagers have scouted.
Each location has a reference, such as 12:7, where you may find plenty of dark wood, or if you need help in bringing back what you’ve chopped down. These references, and anything else you’d like to ask or share with the village, can be put into the village forum to let others know that you need help, or what resources are where. Each tile will give some information about the place, like Points of Interest, Pond, Trees, Enemies, Camp, Hidden Stash etc. You can also mark the location by ticking a box, which will then guide you by the compass on your HUD when on the Area Map. This is useful as you can make your way straight to that location without making any detours and save some valuable stamina points.
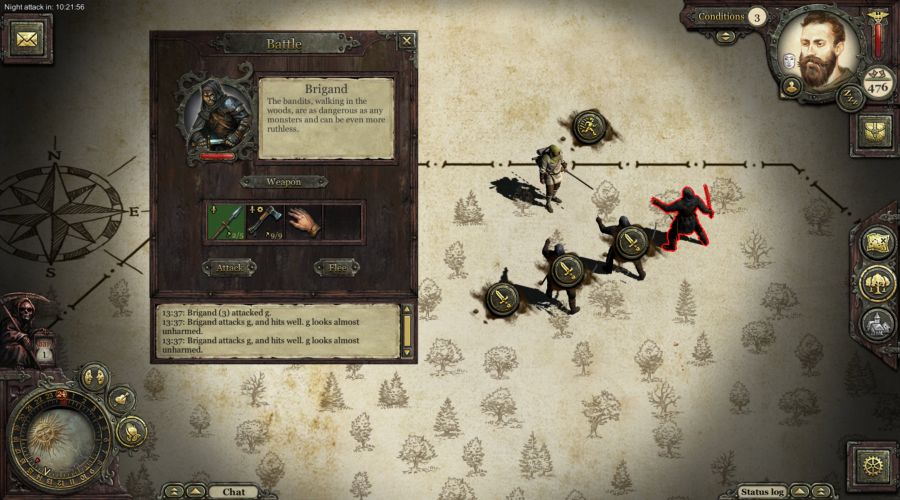
The Area Map is where you’ll do the walking, searching and collecting; each area is hexagonal in shape, just like on the Map of Forest, but shows just one location. You can walk freely inside the areas, but if you want to cross into the next one, or fish, collect, or chop, then you’ll have to use some stamina points to do so. Crossing from area to area can cost a varying number of stamina points depending on your condition; if you’re carrying too much, or you’re hungry or thirsty, it will cost more stamina points, so make sure you have enough to get back home. If you’re unsure of what lies in the next area, it’s a good idea to try and sneak into it; this cost’s extra points, but it could save your life with monsters roaming around.
Keep an eye on your Condition as it will influence how you move and how many stamina points you may use. Always make sure to drink before leaving the village, as well as making sure you’re not hungry, and taking care of any injuries you may have. Carrying too much will slow you down, as will eating too much; it will stop stamina points restoring until you’re back to a normal condition, so take care of yourself. Watch out for your Sanity; just like your Condition, it will affect your efficiency in everything you do. There are five different stages of Sanity, from Stable (rational in your actions and not too stressed), to Petrified (you’ve completely lost your mind; you’re horrified and depressed as you see the end coming).
Sometimes it might be best to make camp in the forest if you’ve travelled a fair way from home. If so, then you’ll need to make sure you take some provisions to tide you over. Taking a tent and being able to start a fire for your camp will allow you to cook and get some rest, restoring some your stamina. It would also be best to take a gourd or water skin with you, making sure to fill them before leaving the village, as it might be best not to drink the pond water unless you really need to. If you do decide to camp out, you could be at risk once the monsters come out to play, so choose somewhere you think will be safe, away from known monster positions.
Keep an eye on the grim reaper 24-hour clock on your HUD, because midnight (real time 11pm UTC) is when the village comes under attack (I hope you haven’t decided to cower in a corner, and instead are helping to guard the village - like Tesco says, “every little helps”). Each day you survive, the monsters increase in number, while closing in on your village to wipe it out.
I’ve only played the standard real-time 24-hour mode so far, and while it can be a bit slow at times (especially if you use up your stamina too fast trying to do too much at once), you can rest, leave the game and come back a bit later to do a bit more, even it’s just crafting or repairing a few items. The stamina does take quite a while to restore fully; eating food will give some more but you can’t keep eating to restore it, as once you become overfed then no more stamina points will restore until you lose the overfed condition. Surviving as long as possible will all come down to teamwork and communication with your fellow villagers.
In the options on the main menu you’ll find volume sliders for Sound FX and Music, Tooltips and a choice of five Languages. There’s also the Tutorial, which consists of ten small videos which show you how to play and survive in Grimmwood. While in game, the options also contain Feedback, Warnings, Ladder and Logout. Graphics settings along with input controls are in the configuration as you start the game up, Screen Resolution, Windowed, Quality (Fastest/Fantastic) and Select Monitor. You’ll also find the latest news on the game on the main menu screen.
Review written by Piston Smashed™ for Zeepond.com!
Positives
+ Nice Artwork+ Up to 40 players on Standard or 10 players on Blitz mode
+ Teamwork and Interaction with other players
Negatives
- No Achievements- No cards
Review Summary
Build, craft, explore and fight monsters, all while working together with up to forty villagers in a bid to survive and protect your village for as long as possible.
Share this review!
Zeepond Rating: 7/10

Video
Game Categories
All Game Reviews (1352)Hardware Reviews (0)
Action (341)
Adventure (151)
Alpha Games (2)
Anime (5)
Board Games (3)
Casual (135)
First Person (19)
First Person Shooter (30)
Hardware (0)
Horror (38)
Massive Multiplayer Online (4)
Pixel Graphics (22)
Platformer (94)
Puzzles (64)
Racing (26)
Role Playing Game (61)
Simulation (53)
Sports (20)
Strategy (246)
Third Person (11)
Utility software (1)
Virtual Reality (22)